About Me

My photo
I support people on their journey to wellness through nutrition and lifestyle coaching! I am passionate about teaching people how lifestyle choices can be fun, inspiring and positively affect all aspects of their lives. I love guiding people to wellness one meal at a time!! I am also a passionate mama, a yogi and I love to cook!

Wednesday, September 19, 2012

Super Simple and Creamy Butternut squash soup


Yay!!!! It’s squash season. My favorite thing about fall is the food! Even though it is not technically fall, the cooler mornings and the few chilli days that we have had makes me feel like fall foods. I love cooking up soups, stews, chilli, cabbage rolls, using the healthiest ingredients of course. All of the comfort and warming foods are so nourishing to the body and the soul! 

Butternut squash soup is definitely on the top of my list. I make it all kinds of ways, sometimes I add an apple or pear, sometimes I add coconut milk and ginger. Depends what mood I am in. I also love it just pure and simple! This soup gets its amazing flavor from roasting the squash. Roasting brings out the natural sweetness in the food that you are cooking. That simple step can be done while doing other things and then the soup can be whipped up in a flash. Enjoy!


1 tbsp organic butter + 1 tbsp of olive oil or 2 tbsp olive oil 
1 onion, diced
1 butternut squash. sliced in 1/2 and seeded
2 large cloves of garlic 
6 cups or so of broth OR water, or enough to cover with 1 inch over vegetables
sea salt and pepper taste

  1. Roast butternut squash face down in a preheated oven at 375 for 45 minutes or until very soft. Take out of oven and let cool for a little bit while doing the rest of your prep. 
  2. Meanwhile sauté onions over medium heat with butter/olive oil or olive oil for about 5 minutes. 
  3. Add garlic, sauté for another 2 minutes. 
  4. Scoop out squash and add to pot along with water/stock to cover over vegetables 1 inch. 
  5. Season with sea salt and pepper. Simmer for about 5 minutes 
  6. Let cool. Add to blender and blend until smooth. 
  7. Re-heat and Enjoy!!!! 

Note - I have a Vitamix which is the most amazing blender on the market. It can handle hot liquid therefore I can skip the ‘let cool” step. If you happen to have a vitamix feel free to skip that step! If you dont have a vitamix, then you really should start a savings account and get one. It is amazing!!! Pricy but worth every penny ;)

Can also be served up in a sippy cup. Please note - it is important to get a BPA free cup, i like tommy tippers!

Share with me! What are your favorite fall foods????

Tuesday, September 11, 2012

Early Fall Loving Breakfast


Well the mornings are starting to get cooler...fall is in the air. When that happens I like to add a bit of warmth to my breakfast. This recipe did the trick for me. I actually really enjoyed the contrast of warm apples and cool yogurt. Yum!

I used local organic apples here. If you read my blog, you know I am all about taking my little girl to pick your own fruit places and we did it again. We went to the local organic farm that I am blessed to have a few minutes away and picked apples. What a difference in taste when you are eating them right off the tree. So even if you are not going apple picking (which you totally should), I would highly suggest you make sure you get local apples. When you go to the grocery store we see apples from all over the place, including New Zealand. Why would we want to buy apples all the way from New Zealand when they are growing in our backyard?? I know many farms dont have as many apples as usual this year due to a late frost so get out there and get them fast. 


Enjoy!

10 Minute Breakfast 

1 apple, diced  
1 tbsp coconut oil 
1 tsp pure maple syrup #2 or 3
Pinch of cinnamon
2-3 heaping spoonfuls of sheep’s milk yogurt or any plain yogurt (add some maple syrup or honey if needed)
1 tbsp hemp seeds (optional)
1 tbsp gogi berries (optional)
2 tbsp granola - I used Living Intentions 

Heat pan to medium/high heat. Add coconut oil and chopped apples. Sauté for 5 minutes or so until soft. Please keep an eye on your pan to ensure that it doesn't get to hot. Adjust temperature as needed. Add maple syrup and let it reduce for 1 minute and add cinnamon.
Add yogurt to a bowl. Top with warm apples, hemp seeds, gogi berries and granola. 

Wednesday, August 29, 2012

The Best Smoothie Ever!!

As you know from my last post, I have an abundant amount of fresh blueberries after picking them with my little girl and some friends just over a week ago. Just writing that makes me smile :) I love blueberries, especially the ones I picked with my little lady. As I said last week, I love eating them by the fistfuls! My second favourite way of enjoying them is in smoothies of course.


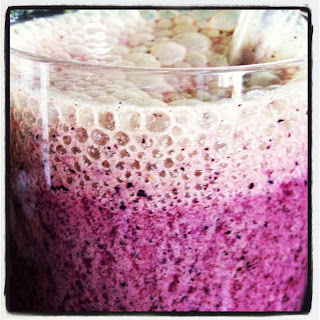
I made a smoothie the other morning that was just so delicious and easy to make that I had to share with you all.
Have you ever bought a young coconut?? Please share with me below if you have and what you did with it!!! I love to hear from you!
I just started buying them for the 1st time this summer. I must say, I am a little addicted to them. They are so tasty and make one heck of a smoothie. At first I wasn't sure what to do with them or even how to open them. Once I got my first one I realized that it is super easy to do and worth any work it takes to get it open.
If you need some help CLICK HERE! That is the video from Eat Naked that I watched to learn how to open a young coconut.
Do you ever buy coconut water?? Well for the same $$$ you can get the same amount of coconut water + the meat of the coconut. And it tastes way better! Try it, I dare you to :O) And please let me know about your experience!!


Here is my new favourite smoothie recipe!

1 cup of fresh blueberries
1 cup of ice
The juice and pulp of 1 fresh young coconut
2 tbsp of hemp seeds
Honey, maple syrup or stevia - sweeten to taste - I used 1 heaping tsp of honey and a touch of stevia

Blend and enjoy the best smoothie ever!


Wednesday, August 22, 2012

Adventures of the Blueberry


Hello Everyone!! I hope you are all enjoying this last little bit of summer! I know I sure am. I love this time of year!! The local produce is so abundant, it has me bursting at the seams with excitement. Yes, I know I am a bit of a nutritionist geek! One of my favorite things to do is go to local farmers markets and pick my produce straight from the source. I find it so relaxing and exciting to know exactly how fresh my food is. It has become a little more hectic with my one year old but still so much fun!
Sophie couldn't get enough blueberries

I truly believe that now more than ever, it is critical to teach our children where our food comes from. Many little ones think that most food comes out of a box from the grocery store and seem to have little connection with our earth and how food is grown. 
I grow some produce in my garden and also go picking to whatever local organic farm I can get to. 
Sophie loves it!!! She has so much fun picking the fruit off the tree and munching away. She actually eats a lot more fruit than she normally would. 
Please!!! Take your kids to your local farms and teach them the importance of eating local and where food actually comes from. 
Why eat local you ask?? Because you are getting the best nutrition for your buck. After a fruit or vegetable is picked it starts to lose its valuable nutrients becoming less and less nutrient dense with every day. It is also a lot cheaper to buy directly from the source. I also think it is important to support our local growers. And most importantly, it tastes so much better!


Blueberries are bursting with flavor and nutrition! I just love them. So when my friend from Appreciating Health told me about a place by her house to go picking, I hopped in the car with Sophie and we went with her and her little man Henry. She lives in Bowmanville. Anyone looking for more information please feel free to email me. 
Mr Cutie Pie Henry loves his blueberries!


Here are some of the beautiful health benefits of the almighty blueberry 

  • Blueberries are phytonutrient superstars. These fruits contain significant amounts of anthocyanadins, which are powerful antioxidants
  • Blueberries are an excellent source of bone-nourishing vitamin K. Yes, you read that right. Blueberries for your bones...who would have thought.
  • Recent research on the powerful antioxidants in blueberries is showing that they have a positive impact on memory and brain health. 
  • Your heart loves blueberries. The antioxidants in blueberries are known to protect the heart 
  • Blueberries are a good source of vitamin C 
  • Blood sugar problems or diabetic?? Blueberries are a great fruit for you, known for their positive affect on blood sugar metabolism

While I love eating blueberries by the fist full, I also love adding them to my smoothies. 

Here is one of my favorite recipes

1 cup of fresh of frozen blueberries 
1 cup of ice 
1 cup of sesame milk (or other milk of choice)
2 tbsp of hemp seeds
2 tsp of raw honey or maple syrup or to taste

Optional superfoods
2 tbsp of yogi berries
1 tsp spirulina
4 swiss chard leaves 
1 tsp of nutrasea fish oil or flax oil 

Blend and enjoy!


Sunday, August 12, 2012

Loving Leftovers!

Hello Everyone!!! I know it has been a long time since I have posted. I have been spending my precious time with my little angel who will be 13 months on the 14th. Can you believe it?? I sure can't. This time has flown by. I am truly grateful for my little Sophie everyday. She has brought so much love and light to this world and to my life. I am blessed everyday!
Look at that face!! It melts my heart every time :)

This was me and my little lady in June picking some organic strawberries. So much fun :)
I am officially back to work and excited to share with you all of my new recipe creations from the past year. I have a lot to share :) It feels good to be back at work and sharing what I know best and feel most passionate about!

Over the years I have seen hundreds of momma's in my nutrition practise. I can't tell you how many times I heard  the common stumbling block of not having enough time to prepare healthy meals for their family and/or fit exercise in. Well to all of the super momma's out there, I truly hear you now. I totally understand what all of my momma clients were talking about. Life is busy!!! And I only have the one! I kinda feel like I am part of the club now and I can truly understand how time can be an obstacle sometimes. Something that I know for sure is that we make time for that which is most important to us. If healthy eating and exercise is of high value to you, somehow, some way you will make it happen.
This is what it looks like in my kitchen when I am cooking :)
I choose to make healthy eating and exercise (more on that in another post) a priority in my household no matter how crazy things get. Sometimes my house isn't as clean as I would like it to be......well pretty much all the time! In my world I would rather have a messy house and eat truly healthy and delicious homemade food! 

I know many of you reading this are also very busy, many much busier than I am. I am going to make it my mission to show you that you can do it to!!! Whether you are a mama or a daddy or just a busy person, I know that you to can find more time to prepare the best most amazing food for you and your family! You can make healthy food fast and delicious!!

The following recipe is a great way to use up leftovers. I made this for lunch today and it took me all of 15 minutes...that was with my little girl at my legs, then wanting up to see what I was doing, then needing a diaper change.....it went on and on, as usual. 

I made this and shared this with my little girl today and we both just loved it!!! This time of year the local produce is so abundant! So many beautiful fruits and veggies to choose from!! It is my favourite time of year.  


Loving Leftovers!


1/2 cup cooked brown rice or quinoa or other whole grain 
1 tsp coconut oil or sesame oil
handful chopped chicken (can also use beans here for a veg option)
a sprinkle of organic tamari
1 cup or more of leftover veggies (or freshly steamed) - here I have cauliflower, yellow zucchini, sweet potato, asparagus and broccoli, all roasted and local
1-2 tbsp of sauerkraut*
1 tbsp of hemp, sesame or sunflower seeds
chopped fresh herbs - i used cilantro here 

Preheat oven to 300F. Put veggies in a oven safe dish, sprinkle with some olive oil and place in the preheated oven. Only takes about 15 minutes to warm through.
While the veggies are warming sauté brown rice and chicken is coconut oil to warm. Add tamari
Place the rice mixture in  bowl. Top with veggies, then sauerkraut, seeds and fresh herbs. 

Enjoy!!! And get creative. The possibilities are endless with this dish. Use whatever you have on hand!

*I make my own sauerkraut. If you don't want to (I totally understand) make your own than I encourage you to get the high quality stuff from your local health food store. I like Eden Organic. The ingredients are cabbage and salt. Pure, simple, delicious and oh so good for you!

Monday, November 21, 2011

Boost Your Health with a Daily Dose of Green Juice!

If you follow my blog you know that I am a new mom to the cutest baby girl that ever was....lol!!! Doesn't ever mother feel that way about their baby?? 
This has meant that sleep and I haven't been great friends lately. I am up with my baby at least 2 times per night and up to 5 times. On top of no sleep I am breastfeeding which takes up a whole lotta energy.  I have to say all of that can take alot out of you. To ensure that I keep my body in tip top shape I have been giving myself a daily boost with green juice. And guess what?? I am feeling pretty great considering that I haven't had a good night sleep in months and I know that it is because I am making great food choices on a daily basis and powering up with a green juice. 
I have a juicer but not a very good one. I feel like I am wasting money every time I use it. The pulp is still so wet and i have to use a ton of produce to get 1 small glass of juice. So I have been using my blender and my nut milk bag (you can get a nut sack at one of my favourite fellow nutritionista’s website http://www.meghantelpner.com/product/nutsack/) . You can also use a fine strainer or cheese cloth. I find the nut milk bag works best...and then you can start making your own homemade nut milks...SO YUMMY!!!
See below for directions on how to make juice using this method. 

Simple Green Juice
1/2 pear or granny smith apple
1/2 juice of 1 lemon
4-6 leaves of chard, kale, collards, dandelion greens
1/2 of a large english cucumber or 2-3 celery stalks 
Optional - 1 small beet - makes this no longer a green juice as the intense red color takes over but adds a touch of sweetness.
Chop up the pear and blend with 1/4 cup of water and juice of 1/2 lemon.
Slowly add in greens and cucumber until well blended
Have large bowl or measuring cup ready. Pour liquid into nut milk bag over the bowl. Squeeze until you have removed all of the liquid. 
Enjoy in a large glass with ice - green juice always tastes better cold!
Serves 1-2 
  
Here are my top 5 reasons why you should consider juicing;
  1. You get the maximum absorption of vitamins, minerals and antioxidants - when you take out the fiber your body can easily absorb and assimilate the nutrients in the juice very quickly. It gives you a quick nutrition boost. Please note - as the juice sits the nutrients get oxidized so drink up quickly. If you are storing juice please store in a glass jar with a good seal on it.
  2. Green juices are alkaline. To learn more about the acid/alkaline balance, check out my post here - http://jamiesnourishingbites.blogspot.com/2010/09/finding-balance-ph-balance-that-is.html
  3. Green juices are a great way to add variety to your veggie consumption. For example, if you are not a big fan of kale (which is delicious and so versitile...but i guess not for everyone) you can always add it to your juice to get the amazing benefits. 
  4. Helps your body gently detoxify keeping your cells healthy and working efficiently
  5. Amazingly abundant energy. Who doesnt want more energy?? Try green juicing for 1 week and experience the energy boost for yourself :O)
Please share with me and my blog followers! Do you juice? What is your favorite combo?

Wednesday, October 26, 2011

Pumpkin Bread

I love pumpkin...it is not a surprise to you if you have followed my blog for a while. 
Check out these past pumpkin lovin' posts. 
 Pumpkin is very low in starch and calories, is rich in fibre and has a whack of powerful antioxidants. This means that pumpkin is not only great for your waist line, it is also a health boosting superfood! 
Most often we see pumpkin in sugar laden rich desserts....making it not a health food anymore. Here and in my past pumpkin posts, I like to reduce the sugar and switch to wholesome sweeteners along with adding other super foods. 
I got inspiration for this recipe from a fellow blogger. Find the link below. I just decreased the honey a bit and added stevia to lower the sugar in this recipe. I also used coconut oil instead of olive oil because i thought it would taste better. And switched up the spice mix by making cinnamon the star here. This loaf is one of my new favourite pumpkin recipes! 
This recipe uses almond flour instead of a grain based flour. It is made by removing the skins of the almonds and grinding into a fine powder. Almond flour is low on the glycemic index, rich in vitamin e, maganese, magnesium, healthy fats and protein. 
Note: My favourite almond flour is by JK Gourmet. It is much better than any other brand I have tried. Contact your local health food store to see if they carry or purchase online HERE! You can also find almond flour at your local BULK BARN

Ingredients
  • 1 heaping cup of pumpkin puree*
  • 3/4 cup of honey
  • 10 drops of liquid stevia
  • 2 tablespoons of coconut oil 
  • 2  omega 3 free range eggs
  • 3/4 teaspoon of baking soda
  • 1/2 teaspoon of salt
  • 1 heaping tbsp cinnamon
  • 2 cups of almond flour
Method
  1. Preheat your oven to 325F
  2. Combine all the ingredients in your high powered blender or food processor (in the order listed)
  3. Bake in a bread pan for 60 minutes or until the outside is very brown. Do the toothpick test to see if it is done! It should come out dry. The timing really depends on how moist your pumpkin puree is. 
*Try roasting your own pumpkin. It is so easy. Cut the top of the pumpkin like you would to carve. Scoop out seeds. Place the top back on pumpkin. Roast at 350 for about an hour, depending on size of pumpkin. I then remove peal, puree and store in the fridge for my favorite pumpkin recipes. Here are a few more of my fave’s.
*RECIPE NOTE - If using canned pumpkin, make sure it is just pure pumpkin

Find some more pumpkin loving goodness from some of my favourite blogs;
Pumpkin Pie Muffins from Elana's Pantry